Applique
As with any applique project, there are numerous ways of doing the applique. Block 7 can be done with needle turn applique, turned machine applique, or fused. The flower shapes on this one are a bit challenging for needleturn, although that is the method I have used. I believe the pattern designer chose to fuse her flowers and then do a decorative hand blanket stitch around the edges. This gives a little more folk art look to the block.
Fabric Selection
There is one fabric included in the kit which is specifically for the flowers in this block. It is the lightest cream fabric, included with your Dedicated Fabrics bundle. For those selecting their own fabrics, choose a fabric here that does stand out. This block is really beautiful and you do want your flowers to be a focal point.
The background I chose for this block is black, as are most of the blocks, and for the stems and leaves I chose a brown hombre plaid. I love the look of the hombre value changes along the flower stems and it gives the leaves a bit of variation so they all look a little different. This fabric also shows up well on the black background, but does not compete with the flowers.
For the centers of the flowers I chose a soft, small scale plaid that is actually a green/gray color with accent threads in both blue and cream. The very small scale of the plaid gives the look of a check in the center of the flowers.
A note of caution however, the fabric I chose to use for the centers is really soft and has very little body. I was very concerned that I would not be able to create the crisp round shape I wanted to with this fabric, so I fused a Pellon featherweight interfacing (#906F) to the back side of this fabric before cutting out my circles. This stabilized the fabric and totally prevented any stretching. It is a technique that I have used frequently on lightweight or stretchy fabrics, such as Japanese Kimono Silk, to allow me to cut and piece them along with my standard quilting cottons. Try it, you will like it.
Assembly of the Block
You will need to copy your applique pattern pages (2) and tape them together to make the complete design. I like to use a light box to trace the design onto the background fabric. You may be surprised to learn that, yes, you can see the pattern lines through black fabric. I learned how to do this when copying Sashiko designs onto dark Indigo fabric. Make sure your pattern lines are dark and bold. When you copy the pattern, go over the lines on your copy with black Sharpie Marker. The fine point, not the extra fine. Then use a light box with a bright light. I have been using one of the newer LED flat panel light boxes and it works great. If you plan on doing this tracing on a window, do it on a bright day in the middle of the afternoon.

On dark fabrics I love to use the Clover white marking pen #517. These pens are fine point, roller ball point pens that go on clear and dry quickly to a chalky white, very fine line. This line will not wipe off while you work and handle the fabric, but instantly come off with water, or just the steam of your iron.
I demonstrated how to make bias stems for flowers in a previous blog article on applique, so I will not repeat that, or the basic technique of turned edge hand applique. Just a few pointers.
Make plastic templates the finished size of your applique pieces. Trace around the templates on the good side of your fabric (not the back), with a marking tool that will come off (test this). Laying the fabric on a sand paper board will prevent it from slipping while you are tracing. The line will be your turning line, so you want to be able to see it clearly. Cut out your pieces leaving a 3/16" seam allowance beyond your marked line. This is about half way between 1/8" and 1/4". It is not critical if this varies a bit, as it will be turned under during the applique process. Just be aware, 1/8" is not really enough, and 1/4" is often a bit to much, so something in between works best.
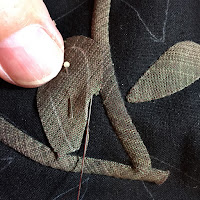
When you are sewing, turn under the edge of your fabric right to the turn line, then finger press with your thumb and take a couple of stitches. Only turn under the fabric just 1/2"-3/4" ahead of where you are stitching. As you go around outside curves, take small stitches and adjust the fold of your edge frequently (sometimes every stitch) so you have a nice curve and not several flat sides like a stop sign. When you are approaching an inside point (like the notches between flower petals), clip your seam allowance once right at the base of the valley just up to the turn line. As you sew and get closer to this valley, your seam allowance will get smaller and smaller until there is no seam allowance at all.

Your stitches should get closer together, and you need to take a deeper stitch, beyond the turn line, creating a bit of satin stitching right over the valley. Then begin increasing your stitch spacing, back to about 1/8" apart again. Note the satin stitching over the base of the valleys on my flower. Choose a close matching thread for this so it does not show much.
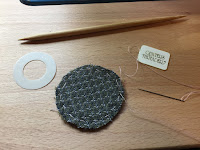
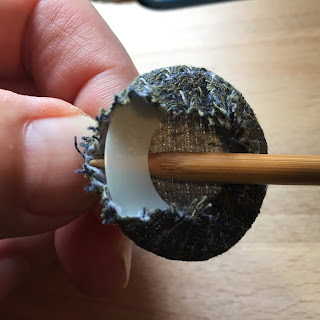
To make perfect circles for your centers, use a template form the correct size. I like Perfect Circles by Karen Kay Buckley. This pack has all the circle sizes you need for most projects and they are heat resistant, so you can baste around your fabric circle then pull and tighten the basting forming the fabric around the circle template. While you have the basting tight, iron the circle, setting the perfect circular edge, then remove the template.
Stitching down your circles is just a breeze as the edges are already turned perfectly!
Here is our finished applique. We will be trimming this block later when we make the blocks for next month and attach them to the bottom of the flowers.
Thanks for following along. Happy stitching.
Steve


